Spatial Join
Click here to start watching the Spatial Join video.
|
Click here to download the data that the author used for the course lesson. By downloading the data you will be able to follow the steps completely.

|
Introduction
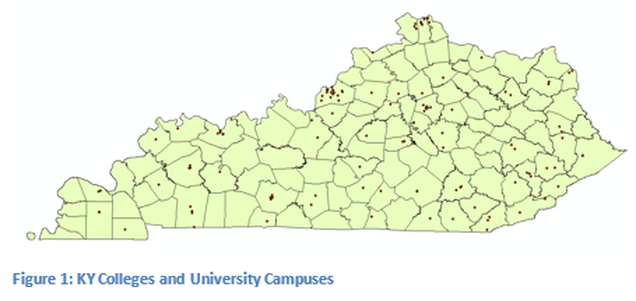
A spatial join creates a new layer that will contain a field which will be the count of the number of items contained within a certain polygon or a field in existing layer. For example if you know the number of residence 18 years of age and greater in a county and have the voting districts polygons boundaries for the county, then you can count the number voter in each district. If you find that one of the districts have many more voters than others this may lead to the changing of the boundaries of the district. This is one of the reasons that a Census is done every 10 years for the entire United States so that a proper alignment of the House of Representatives of the US Congress can be done. Figure 1: KY Colleges and University Campuses displays the location of college and university campuses within Kentucky, the underlying map is of Kentucky counties. In this example we will count the number of colleges per county. Data for this example can be found at: https://drive.google.com/open?id=1EhCjRZ3td79SH7FXs6t3YAq0D7W-mKvi
|
Process
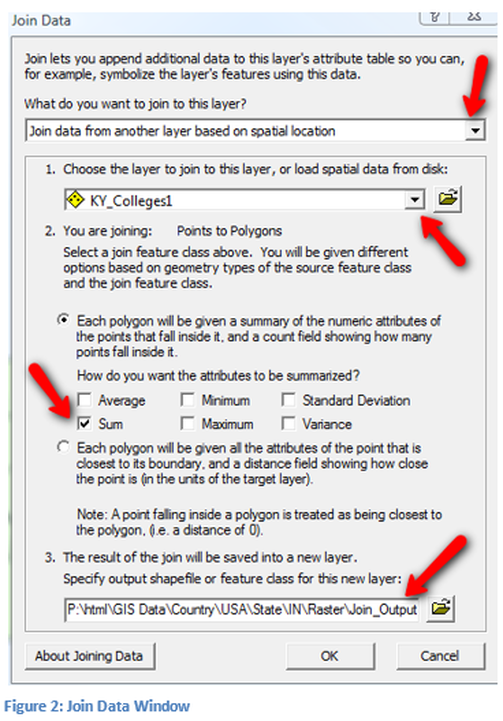
Right Click on the County map layer, then click on Join and Relate, and finally click on Join. In Figure 2: Join Data Window you will see the Join Data window; there are four selections that you must make. First use the pull down at the top of the window, there are two types of joins spatial and tabular. In this case we will be using the spatial join. Selection number 1, selects the file to be spatial joined with the county polygon shapefile; for this case we have only one point file and it was automatically selected if we had multiple files we would have needed to use the pull down or if the file was not loaded within ArcMap we would have used the file folder. Selection number 2 is what do we want to do with the point data and in our case we want to count it so the appropriate check box is Sum. Selection number 3 is the location and name of the file that will be created by the spatial join. Note the original data files will not be changed but instead a new layer file will be created.
|
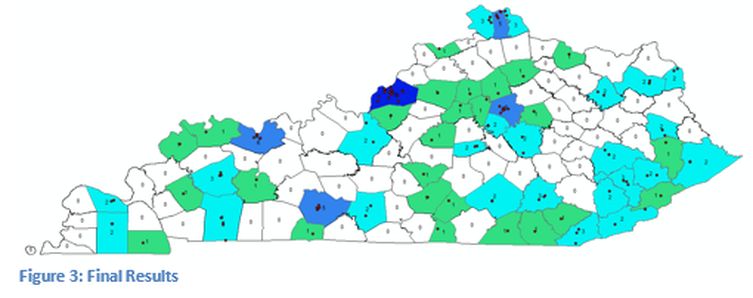
Once all the information has been selected and OK pressed than a process window will appear. The time for this process to occur will depend on the speed of the computer and the number of items to be joined. A new layer will be created and displayed, to see the results of your join you will need to go to the properties windows and select a symbology that displays the results, several new fields were created and the one you should display was named count. Figure 3: Final Results displays the location of the college and university campuses, labels were turned on to show the number of campuses within a county and color coded to show density of campuses.

