Introduction to Metadata
The purpose of this section is to show how to create and edit metadata associated with an Esri shapefile. Metadata is important to geospatial data files because it describes information such as geographical projection, location represented by the file, the producer of the information, geographical footprint, etc. Metadata is defined as: data about data, it is a means of providing information to the user about the data provided by the creator or modifier of the data set. The editing and creation of metadata for this module was achieved using ArcCatalog. There are multiple attributes that can be put into the metadata file, a template will be used to keep a standard format of information. In general, an organization or a company will have a predetermined requirement for metadata. Sometimes the creation of metadata can be overlooked, but it should be a part of the standard operating procedure so that files can be identified easily.
ArcCatalog can be started from inside ArcMap or from the stand alone ArcCatalog application. In this example the ArcCatalog application will be used. If the icon is not on the desktop a search of installed programs will be required.
The creation of metadata is an easy process, the harder part is making sure the appropriate information is included in the metadata. ArcCatalog has multiple templates to make the work simpler.
The creation of metadata is an easy process, the harder part is making sure the appropriate information is included in the metadata. ArcCatalog has multiple templates to make the work simpler.
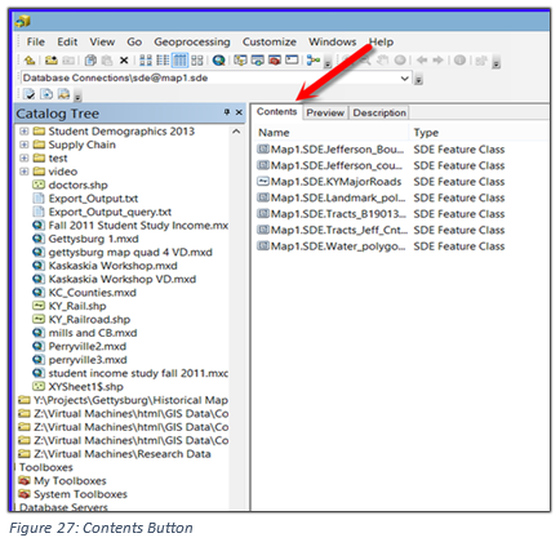
Open ArcCatalog and locate a shapefile in which editorial rights are available. A new shapefile can be created but this should not be necessary. TIGER data from the U.S. Census Bureau is a good source for shapefiles. The contents, shown in Figure 27, is of a geodatabase, but it could be for a folder. Notice: the contents tab is selected and shows the files of the geodatabase named Map1. If you had selected a folder it would look similar.
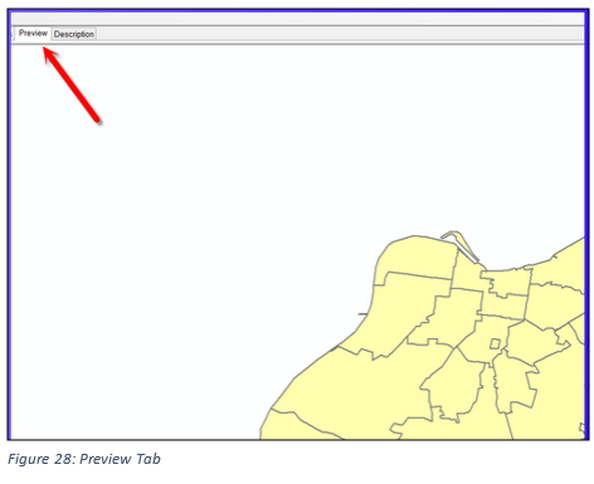
Click on one of the shapefiles and then select the Preview Tab. ArcCatalog reads the file and generates an image, see figure 28.
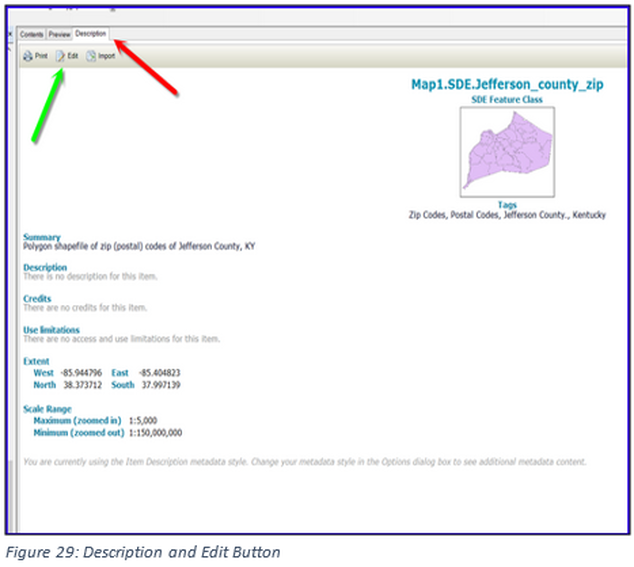
Click on the Description Tab to show the metadata. This particular file contains a small amount of metadata which has already been created. Some of the metadata for this shapefile is the thumbnail image of the shapefile, tags, summary, description, credits, use limitations, extent and scale range. All items shown, in Figure 29, were added by the author except those that were pre-programmed. Once the metadata has been reviewed the content is ready to be edited. In this lesson a different file will be shown, so that the metadata is mainly empty. A preprogrammed template was used for metadata called Item Description. The template information can be modified. Highlight the file you wish to add metadata to and select Edit, see Figure 30.
Process
In this section the different types of metadata will be discussed. The learner may use a file of their selection or the one the author used. The author’s file can be downloaded here. Click to download
Title
The green arrow points to the title which is the default name of the file. The title should be selected so that it describes the file and since this is only displayed in the metadata spaces can be used in the title name. To modify the title highlight it and begin typing, see figure 30.
Thumbnail
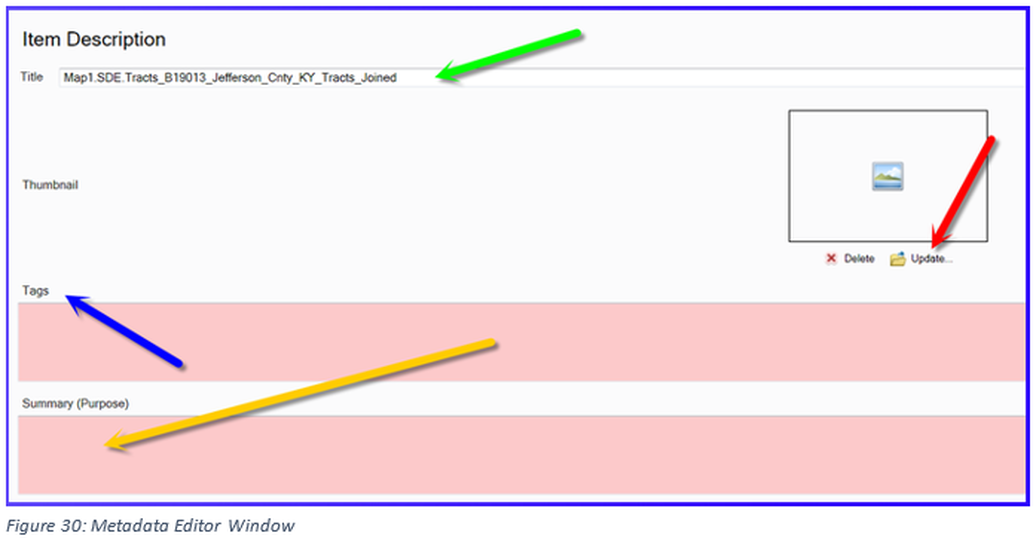
The thumbnail is an image file. The thumbnail is not a direct reading of the shapefile. If the shapefile has not been opened and exported, no image has been created. The shapefile should be an image with no specific symbology applied or querying of the data, since this will be an overview of the data, i.e. open the shapefile with no other shapefiles open and export it as an image. Since an image file has already been created for this shapefile click on the file folder being pointed to by the red arrow and locate the file to be uploaded. The image file will be saved with the metadata so it will not need to be accessed in the future.
Tags
Tags are key words or phrases that will assist someone locating files and being able to use them. In addition it helps the designer to locate their own information and thus narrowing search times. This particular shapefile is of Jefferson County in Kentucky at the Census tract level and has had a tabular join completed for attribute B19013 from the U.S. Census Bureau, American Community Survey, see Figure 30.
Summary
The summary is a brief description of the file. A useful summary would state the location of the file, type of file, i.e. polygon, line, point and a little about the content.
Description
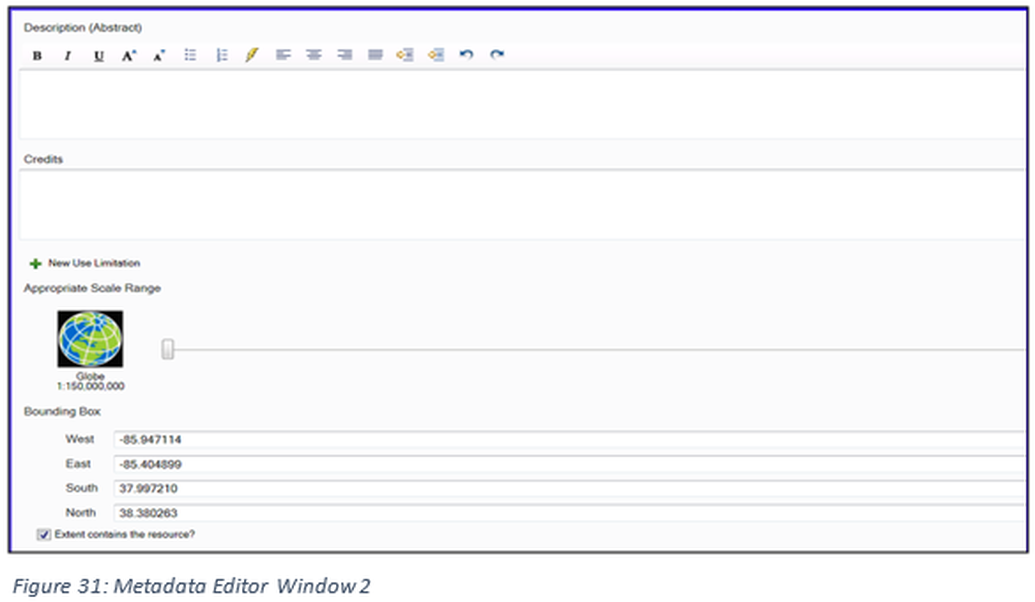
The description is a much more in-depth understanding of the file, it is especially useful if the data will be used by others, see figure 31.This would include an understanding of why the file was created and the significance of the file. It might also include information about what project the file was designed for, this can assist a user in determining if the file is appropriate for their application. By creating this description it eliminates guess work. The file projection might be included in the templates automatically. For this example only a brief description was used. This window also allows for text formatting.
Credit
Appropriate credit should be given to the author and the author’s organization, see figure 31.
Use Limitations
Use Limitations is a copyright or Creative Commons specification on the use of the dataset. Files that are created from scratch should have a Creative Commons license (https://creativecommons.org/).
Appropriate Scale Range
The scale range works by using the slider, this does not change the actual scale in which the file can be used, it is only a recommendation to the user that the file is appropriate at the specific scale range. The largest scale is for the whole Earth and the smallest is for the individual building level. The default level can be used or modify by moving the slider, as shown in figure 31.
Bounding Box
The bounding box is the geographic area that a file contains information about. This was not changed from the default value which is based upon the file information.
Other Metadata Templates (Styles)
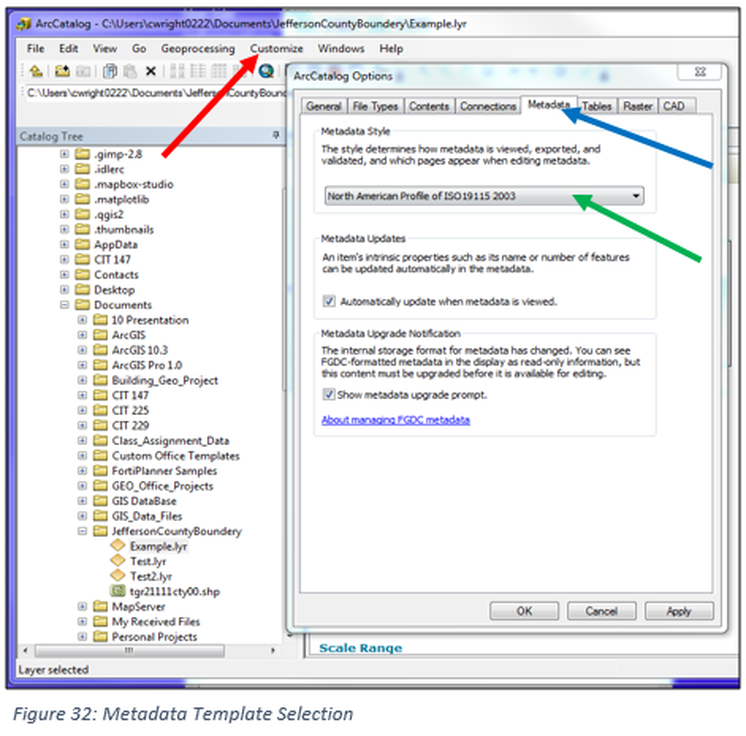
Additional information can be included in a metadata window, see Figure 32. The default values shown was the result of the chosen template. Other templates are available with different attributes. To select a different template the process is to: open the Customize tab and select ArcCatalog Options, choose the Metadata tab, use the pull down arrow under the Metadata Styles and select a template, in this example North American Profile was selected, then click Apply and OK.
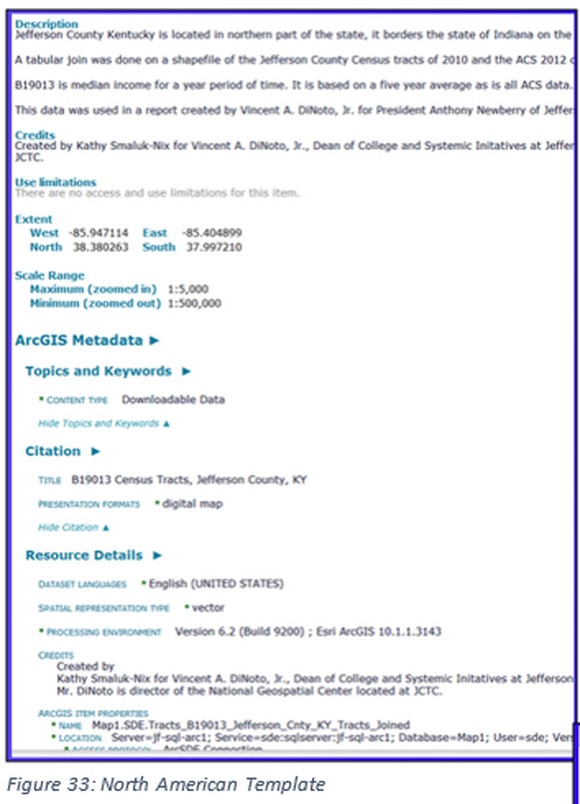
Click the Contents tab and then the Description tab to refresh the view. The results should be similar to figure33. Note: more attributes are now available, some have been populated with default information and others are blank.
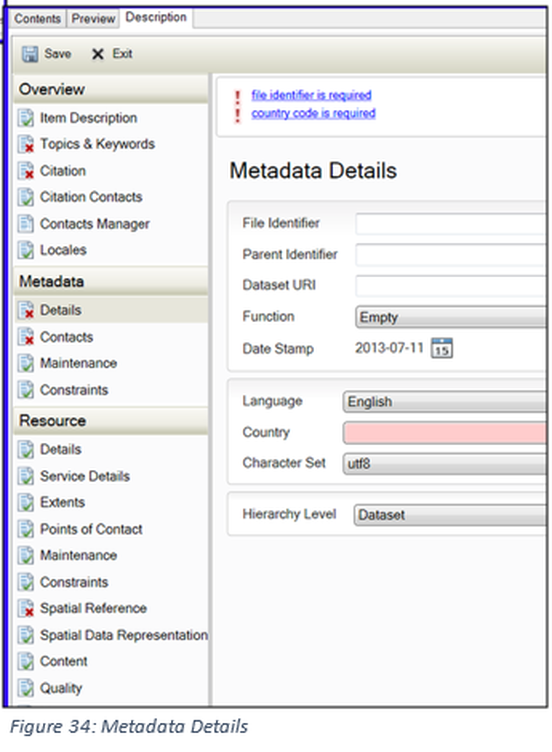
Additional attributes are available to give a more in-depth knowledge about the shapefile, none of the information from the previous work has been lost. Click on the edit button, additional buttons will appear at the top of the window. The editor looks somewhat different, a new side menu has been added. The side menu provides the ability to control specific areas of the metadata, see Figure 34. Once the edits have been completed the information must be saved.
Map Package
To share information contained in a single layer file with other users, a layer package can be created. If all the information in map project is to be shared, a map package must be produced. Map packages are required because the transporting of project files from one user to another is not as straight forward as only providing the project file and shapefiles. This problem is due to data disassociation issues in ArcMap. When a project file is moved to a new user or to a different computer all data will become disassociated. To transport a complete map including the data to another user or a different computer, with complete functionality and not requiring reassociation, a map package must be created in Esri ArcMap. The map package will contain all the properties for each layer such as colors, width of lines, queries, labels, etc.; it will also contain the shapefiles attributes.
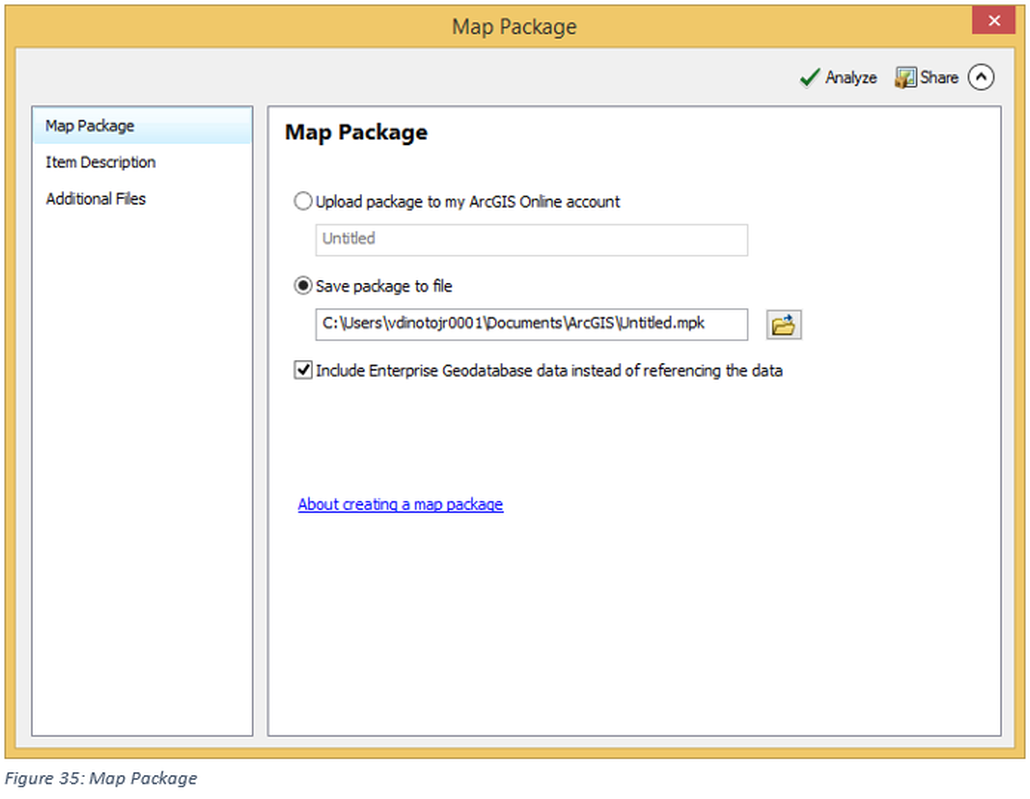
To create the Map Package, the process is located under the file tab, select Share As and then Map Package. The Map Package window has the same appearance as the Layer Package, see Figure 35. On the left side are three items which will produce different windows for the user. In the upper right corner are two additional tools. Provide a name for the map package and a storage location, once the package is created it is a standalone file and can be moved to any location required, therefore this storage location should be seen as a temporary location. The map package is also a way to create archives of past work. On the Item Description Screen the user will provide a summary, description, tags and information about the creator. This information is required for the creation of the map package. The third item gives the user the ability to add files to the map package that are not directly associated with the map, this can be important, such as providing base information before modifications were made to the shapefiles. The two button on the upper right are critical in the creation of the map package, the far right (Share button) creates the map package. The Analyze button will check the data to make sure it is ready for transport, it will return warnings and errors, map packages can be constructed with warnings, but realize the higher the level of the warning the more chances of problems, map packages will not be created if there are errors. Once the map package has been created, it is ready to move to other computers of the user or other individuals. Realize this file can be extremely large in size.
Note: Every technical skills assignment (homework) should include a map package unless the instruction specifically says this is not required. By providing the map package the instructor can determine the process and methodology used in the map creation. If the project file (mxd) is provided instead the assignment will be returned ungraded.
Note: Every technical skills assignment (homework) should include a map package unless the instruction specifically says this is not required. By providing the map package the instructor can determine the process and methodology used in the map creation. If the project file (mxd) is provided instead the assignment will be returned ungraded.

